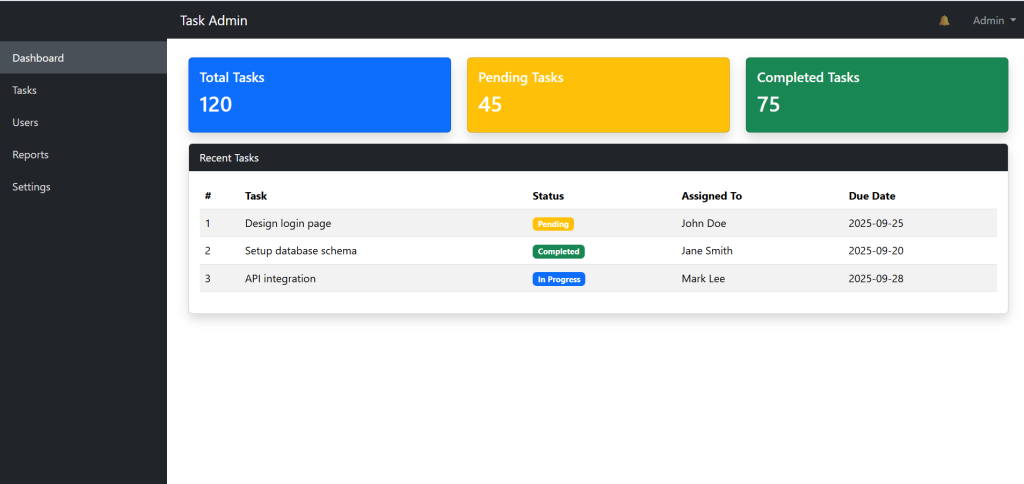
When you first start learning web development, one of the projects that gives you both confidence and real-world practice is creating an admin template. If you’ve ever logged into a website dashboard , like WordPress, Shopify, or even your email client , you’ve already seen examples of admin templates.
They’re not just about looks, they’re about usability, structure, and performance.
In these topics I want to guide use how design professional admin template by HTML, CSS, and JS and bootstraps for layout designing.
Building responsive admin templates

Why Build an Admin Template?
Before starting code lets talks why we building admin template is important.
Centralized Control: Admin templates are used to manage data, users, and system settings in one place.
Productivity: A well-designed template saves time by presenting important information clearly.
Customization: When you design it yourself, you’re not limited by pre-built designs or licensing
After talking about the importance of building admin template lets start code step by step now.
Folder structure of the project
project/
│ index.html
│ style.css
│ script.js
│ images/
│ profile.jpg
│ pages/
│ users.html
│ reports.html
Step 1: Plan the Layout
Like any project, don’t jump straight into coding. Take a notebook or open Figma/Sketch and sketch out what your admin panel should look like. Most admin templates follow a fairly predictable structure:
- Top Navigation Bar – Logo, profile picture, notifications, and maybe a search bar.
- Sidebar Menu – Links to different sections: Dashboard, Users, Settings, Reports, etc.
- Main Content Area – The largest section, where charts, tables, forms, or analytics will appear.
- Footer (optional) – For copyright or quick links.
Step 2: Set Up the HTML Structure
Lets write clean structure of html in blows
<!DOCTYPE html>
<html lang="en">
<head>
  <meta charset="UTF-8">
  <meta name="viewport" content="width=device-width, initial-scale=1.0">
  <title>Admin Template</title>
  <link rel="stylesheet" href="style.css">
</head>
<body>
  <div class="wrapper">

    <!-- Sidebar -->
    <aside class="sidebar">
      <h2 class="logo">MyAdmin</h2>
      <ul class="menu">
        <li><a href="#">Dashboard</a></li>
        <li><a href="#">Users</a></li>
        <li><a href="#">Reports</a></li>
        <li><a href="#">Settings</a></li>
      </ul>
    </aside>

    <!-- Main Area -->
    <div class="main">

      <!-- Top Navbar -->
      <header class="navbar">
        <input type="text" placeholder="Search...">
        <div class="profile">
          <img src="profile.jpg" alt="User">
          <span>Admin</span>
        </div>
      </header>

      <!-- Content -->
      <section class="content">
        <h1>Dashboard</h1>
        <p>Welcome back! Here’s an overview of your system.</p>

        <div class="cards">
          <div class="card">Users: 102</div>
          <div class="card">Orders: 56</div>
          <div class="card">Revenue: $12,340</div>
        </div>
      </section>
    </div>
  </div>

  <script src="script.js"></script>
</body>
</html>
These is the starting point of admin template, you can get side bar with menus.

Step 3: Styling With CSS
In step two we create hard code, not design and styled , in these step we style and designed it.
create style.css file on your project folders
/* Reset some basics */
* {
  margin: 0;
  padding: 0;
  box-sizing: border-box;
  font-family: Arial, sans-serif;
}

body {
  display: flex;
  height: 100vh;
  background: #f4f6f9;
}

.wrapper {
  display: flex;
  width: 100%;
}

/* Sidebar */
.sidebar {
  width: 220px;
  background: #2c3e50;
  color: white;
  padding: 20px;
}

.sidebar .logo {
  margin-bottom: 30px;
  font-size: 22px;
  text-align: center;
}

.sidebar .menu li {
  list-style: none;
  margin: 15px 0;
}

.sidebar .menu li a {
  color: white;
  text-decoration: none;
  padding: 10px;
  display: block;
  border-radius: 4px;
}

.sidebar .menu li a:hover {
  background: #34495e;
}

/* Main area */
.main {
  flex: 1;
  display: flex;
  flex-direction: column;
}

/* Navbar */
.navbar {
  background: white;
  padding: 10px 20px;
  display: flex;
  justify-content: space-between;
  align-items: center;
  border-bottom: 1px solid #ddd;
}

.navbar input {
  padding: 6px 10px;
  border: 1px solid #ccc;
  border-radius: 4px;
}

.navbar .profile {
  display: flex;
  align-items: center;
}

.navbar .profile img {
  width: 32px;
  border-radius: 50%;
  margin-right: 8px;
}

/* Content */
.content {
  padding: 20px;
}

.cards {
  display: grid;
  grid-template-columns: repeat(3, 1fr);
  gap: 20px;
  margin-top: 20px;
}

.card {
  background: white;
  padding: 20px;
  border-radius: 6px;
  box-shadow: 0 2px 5px rgba(0,0,0,0.1);
  text-align: center;
  font-weight: bold;
}
Step 4: Add Interactivity With JavaScript
Lets add some javascript to code to interactive and dynamic change of the buttons.
create script.js on your project folder and past below codes
const sidebar = document.querySelector('.sidebar');
const toggleBtn = document.createElement('button');
toggleBtn.textContent = '☰';
toggleBtn.classList.add('toggle-btn');

document.querySelector('.navbar').prepend(toggleBtn);

toggleBtn.addEventListener('click', () => {
  sidebar.classList.toggle('active');
});
Step 5: Download Project
Download the project from the link below and use it with fun

