
🛍️ Step 5 – Building the Frontend Store Page in Laravel
Making your products displaying to customers / producing your product to market.
In the earlier steps of this series, you created a Laravel e-commerce project, designed its database schema, and built a full CRUD system for managing products. That gives you the power to add, edit, and delete products in the backend.
But so far, all that work lives behind the scenes. A real e-commerce website must allow customers to browse products, view details, and eventually add them to their cart. That’s where the frontend store page comes in.
This step will walk you through creating the public shop interface of your Laravel application. We’ll cover everything from the controller logic to the Blade templates, and sprinkle in practical advice and UX tips from real-world experience.
🎯 Goals for This Step to build e-commerce
Let’s clearly define what we are building so you understand the roadmap:
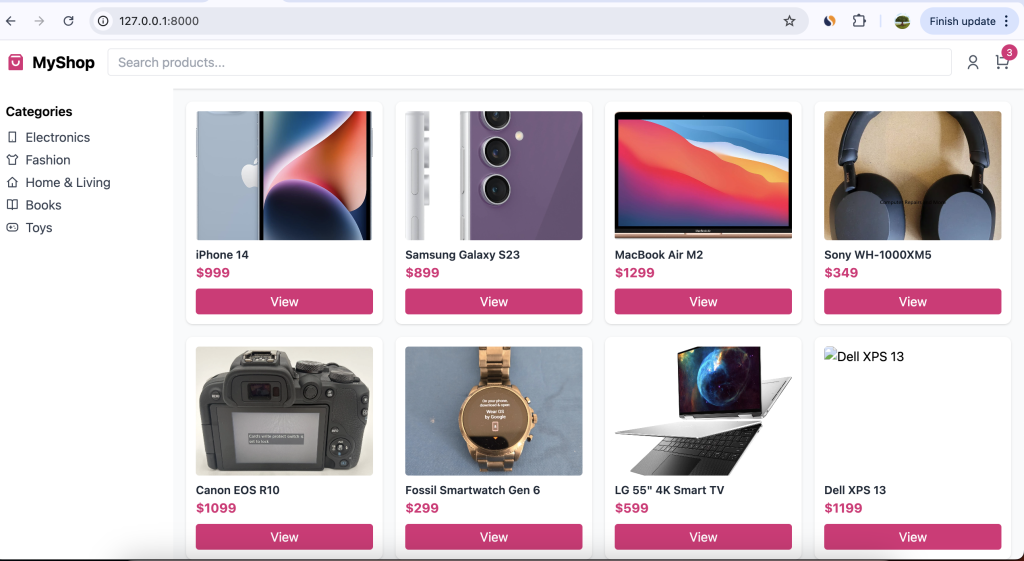
- A main shop page that lists all products in a grid layout as the above.
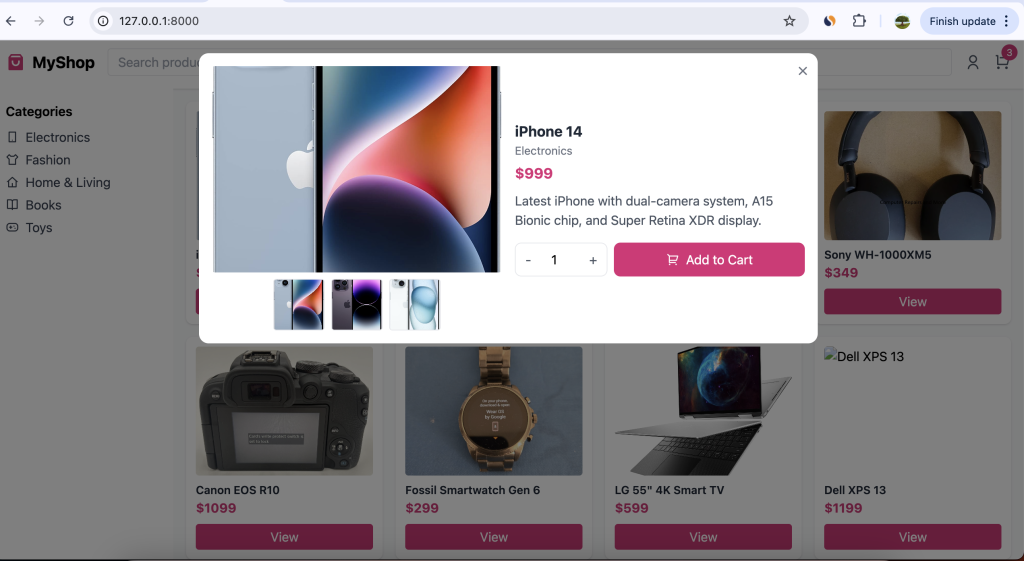
- Each product shows image, name, price, and a link to view more with modal popup with gallery imgagesd.
- A product detail page that shows full description, stock, and an “Add to Cart” button.
- Use of Bootstrap to quickly make it look clean and responsive.
- Prepare the structure for future steps (cart and checkout).
In short, you’re turning your data into a real storefront.
🧠 Why This Matters
This is often the first impression users get of your website. A sloppy, text-heavy page will turn people away. But a clean, image-driven design builds trust and engagement.
Also, by building this yourself instead of using a ready-made template, you’ll learn how to:
- Connect Laravel models to frontend pages
- Use Blade templating effectively
- Structure your routes for public pages
- Paginate products for better performance
This is foundational Laravel knowledge that applies to almost any type of app.
⚙️ Step 1: Create the ShopController
In Laravel, the controller will handle the logic of fetching products from the database and passing them to the views.
Run the Artisan command to create it:
php artisan make:controller ShopController
This creates app/Http/Controllers/ShopController.php.
Open it and add:
namespace App\Http\Controllers;

use App\Models\Product;

class ShopController extends Controller
{
    // Show all products
    public function index()
    {
        $products = Product::latest()->paginate(12);
        return view('shop.index', compact('products'));
    }

    // Show a single product
    public function show($id)
    {
        $product = Product::findOrFail($id);
        return view('shop.show', compact('product'));
    }
}
What’s happening here:
- We fetch products with
Product::latest()so newest ones appear first. paginate(12)automatically limits to 12 per page and adds pagination links.- The
showmethod finds a specific product using its ID and displays details.
By separating these two actions (index and show), your code stays clean and maintainable.
⚙️ Step 2 Define Public Routes
Your controller won’t work until you wire it into routes.
Open routes/web.php and add:
use App\Http\Controllers\ShopController;

Route::get('/', [ShopController::class, 'index'])->name('shop.index');
Route::get('/product/{id}', [ShopController::class, 'show'])->name('shop.show');
We use resource concept on the blade templates that contains multiple functions on single routes.
Key notes:
- The root
/URL now loads your shop’s homepage. /product/{id}shows details for any product by ID.- Using named routes (
name('shop.index')) helps if you ever change URLs later.
Make sure these routes are placed below your admin routes so they don’t conflict.
⚙️ Step 3 : Build the Blade Views
Now for the fun part: designing the HTML your customers will see.
<!DOCTYPE html>
<html lang="en">
<head>
  <meta charset="UTF-8">
  <meta name="viewport" content="width=device-width, initial-scale=1.0">
  <title>MyShop - Home</title>
  <script src="https://cdn.tailwindcss.com"></script>
  <link href="https://cdn.jsdelivr.net/npm/remixicon/fonts/remixicon.css" rel="stylesheet">
  <style>
    .zoom:hover { transform: scale(1.05); transition: transform .3s ease; cursor: pointer; }
    .search-suggestions { display: none; position: absolute; top: 100%; left: 0; right: 0; background: white; border-radius: 0 0 8px 8px; z-index: 50; max-height: 200px; overflow-y: auto; box-shadow: 0 2px 8px rgba(0,0,0,0.1); }
    .search-container:focus-within .search-suggestions { display: block; }
    .search-suggestion-item { padding: 8px 12px; cursor: pointer; }
    .search-suggestion-item:hover { background-color: #ffe4f0; }
  </style>
</head>
<body class="bg-gray-50">

<header class="bg-white shadow p-4 flex items-center justify-between">
  <div class="flex items-center space-x-2">
    <i class="ri-shopping-bag-3-fill text-pink-600 text-2xl"></i>
    <h1 class="text-xl font-bold">MyShop</h1>
  </div>

  <div class="flex-1 mx-4 search-container relative">
    <input type="text" placeholder="Search products..." id="searchInput" class="w-full border rounded px-3 py-1 focus:outline-none focus:ring-2 focus:ring-pink-300">
    <div class="search-suggestions" id="searchSuggestions">
      <div class="search-suggestion-item">iPhone 14</div>
      <div class="search-suggestion-item">Samsung Galaxy</div>
      <div class="search-suggestion-item">Running Shoes</div>
    </div>
  </div>

  <div class="flex items-center space-x-4">
    <a href="#"><i class="ri-user-line text-xl text-gray-600 hover:text-pink-600"></i></a>
    <a href="#" class="relative">
      <i class="ri-shopping-cart-line text-xl text-gray-600 hover:text-pink-600"></i>
      <span class="absolute -top-2 -right-2 bg-pink-600 text-white text-xs rounded-full h-5 w-5 flex items-center justify-center">3</span>
    </a>
  </div>
</header>

<div class="flex">
  <aside class="w-56 bg-white p-4 hidden md:block">
    <h2 class="font-semibold mb-2">Categories</h2>
    <ul class="space-y-1 text-gray-700">
      <li><a href="#" class="hover:text-pink-600 flex items-center gap-2"><i class="ri-smartphone-line"></i> Electronics</a></li>
      <li><a href="#" class="hover:text-pink-600 flex items-center gap-2"><i class="ri-t-shirt-line"></i> Fashion</a></li>
      <li><a href="#" class="hover:text-pink-600 flex items-center gap-2"><i class="ri-home-4-line"></i> Home & Living</a></li>
      <li><a href="#" class="hover:text-pink-600 flex items-center gap-2"><i class="ri-book-open-line"></i> Books</a></li>
      <li><a href="#" class="hover:text-pink-600 flex items-center gap-2"><i class="ri-gamepad-line"></i> Toys</a></li>
    </ul>
  </aside>

  <main class="flex-1 p-4">
    <div id="productGrid" class="grid grid-cols-1 sm:grid-cols-2 md:grid-cols-3 lg:grid-cols-4 gap-4"></div>
  </main>
</div>

<!-- MODAL -->
<div id="productModal" class="fixed inset-0 bg-black bg-opacity-50 hidden items-center justify-center z-50 p-4">
   <div class="bg-white rounded-xl max-w-3xl w-full p-4 relative mx-auto my-auto">
    <button onclick="closeModal()" class="absolute top-2 right-2 text-gray-500 hover:text-gray-800">
      <i class="ri-close-line text-xl"></i>
    </button>
    <div class="grid grid-cols-1 md:grid-cols-2 gap-4">
      <div class="flex flex-col items-center">
        <img id="modalImage" class="w-full h-64 object-cover rounded mb-2 zoom" src="" alt="">
        <div id="thumbnailContainer" class="flex gap-2 justify-center"></div>
      </div>
      <div class="flex flex-col justify-center text-center md:text-left">
        <h3 id="modalTitle" class="text-lg font-bold text-gray-800"></h3>
        <p id="modalCategory" class="text-gray-500 text-sm"></p>
        <p id="modalPrice" class="text-pink-600 font-bold text-lg mt-1"></p>
        <p id="modalDescription" class="text-gray-600 mt-2"></p>
        <div class="flex gap-2 mt-4 justify-center md:justify-start">
          <div class="flex items-center border rounded-lg">
            <button onclick="decreaseQty()" class="px-3 py-2 text-gray-600 hover:text-pink-600">-</button>
            <input type="number" id="quantityInput" value="1" min="1" class="w-12 text-center border-0 focus:ring-0">
            <button onclick="increaseQty()" class="px-3 py-2 text-gray-600 hover:text-pink-600">+</button>
          </div>
          <button class="flex-1 bg-pink-600 text-white py-2 rounded-lg hover:bg-pink-700 flex items-center justify-center gap-2">
            <i class="ri-shopping-cart-2-line"></i> Add to Cart
          </button>
        </div>
      </div>
    </div>
  </div>
</div>

<script>
 const products = [
  {
    title: 'iPhone 14',
    price: 999,
    category: 'Electronics',
    images: [
      'https://m.media-amazon.com/images/I/61bK6PMOC3L._AC_SL1500_.jpg',
      'https://m.media-amazon.com/images/I/71yzJoE7WlL._AC_SL1500_.jpg',
      'https://m.media-amazon.com/images/I/71d7rfSl0wL._AC_SL1500_.jpg'
    ],
    description: 'Latest iPhone with dual-camera system, A15 Bionic chip, and Super Retina XDR display.'
  },
  {
    title: 'Samsung Galaxy S23',
    price: 899,
    category: 'Electronics',
    images: [
      'https://d3d71ba2asa5oz.cloudfront.net/12003181/images/s711upurpl2.jpeg',
      'https://m.media-amazon.com/images/I/71ZGYsdxT0L._AC_SL1500_.jpg',
      'https://m.media-amazon.com/images/I/71XzLkjcOEL._AC_SL1500_.jpg'
    ],
    description: 'High-performance smartphone with AMOLED display and long-lasting battery.'
  },
  {
    title: 'MacBook Air M2',
    price: 1299,
    category: 'Electronics',
    images: [
      'https://m.media-amazon.com/images/I/71vFKBpKakL._AC_SL1500_.jpg',
      'https://m.media-amazon.com/images/I/71f5Eu5lJSL._AC_SL1500_.jpg',
      'https://m.media-amazon.com/images/I/61bX2AoGj2L._AC_SL1500_.jpg'
    ],
    description: 'Lightweight laptop with M2 chip, Retina display, and all-day battery life.'
  },
  {
    title: 'Sony WH-1000XM5',
    price: 349,
    category: 'Electronics',
    images: [
      'https://i.ebayimg.com/images/g/DHkAAOSwWkdm5mCx/s-l1600.webp',
      'https://m.media-amazon.com/images/I/71XMS5xZR5L._AC_SL1500_.jpg',
      'https://m.media-amazon.com/images/I/61OU6dD4eUL._AC_SL1500_.jpg'
    ],
    description: 'Premium noise-canceling wireless headphones with immersive sound.'
  },
  {
    title: 'Canon EOS R10',
    price: 1099,
    category: 'Electronics',
    images: [
      'https://i.ebayimg.com/images/g/WfoAAeSwuWpowRi6/s-l1600.webp',
      'https://m.media-amazon.com/images/I/81Hb44xV7ZL._AC_SL1500_.jpg',
      'https://m.media-amazon.com/images/I/81p+OibwcRL._AC_SL1500_.jpg'
    ],
    description: 'Mirrorless camera with 24.2MP sensor and fast autofocus system.'
  },
  {
    title: 'Fossil Smartwatch Gen 6',
    price: 299,
    category: 'Electronics',
    images: [
      'https://i.ebayimg.com/images/g/TKkAAOSwPN9mMQna/s-l1600.webp',
      'https://m.media-amazon.com/images/I/71W+vHa9K2L._AC_SL1500_.jpg',
      'https://m.media-amazon.com/images/I/71eVC+WQ+xL._AC_SL1500_.jpg'
    ],
    description: 'Stylish smartwatch with fitness tracking and heart rate monitoring.'
  },
  {
    title: 'LG 55" 4K Smart TV',
    price: 599,
    category: 'Electronics',
    images: [
      'https://i.ebayimg.com/images/g/2KYAAOSwnsxi2k1K/s-l1600.webp',
      'https://m.media-amazon.com/images/I/81Zt42ioCgL._AC_SL1500_.jpg',
      'https://m.media-amazon.com/images/I/91y5dQZm3yL._AC_SL1500_.jpg'
    ],
    description: 'Ultra HD Smart TV with vibrant colors and built-in streaming apps.'
  },
  {
    title: 'Dell XPS 13',
    price: 1199,
    category: 'Electronics',
    images: [
      'https://m.media-amazon.com/images/I/71zHNgM6akL._AC_SL1500_.jpg',
      'https://m.media-amazon.com/images/I/61kRkfsIMbL._AC_SL1500_.jpg',
      'https://m.media-amazon.com/images/I/71rmA5zuTEL._AC_SL1500_.jpg'
    ],
    description: 'Powerful and compact laptop with stunning InfinityEdge display.'
  },
  {
    title: 'Apple iPad 10th Gen',
    price: 499,
    category: 'Electronics',
    images: [
      'https://m.media-amazon.com/images/I/61uA2UVnYWL._AC_SL1500_.jpg',
      'https://m.media-amazon.com/images/I/61tq7UhtsXL._AC_SL1500_.jpg',
      'https://m.media-amazon.com/images/I/71MHTD3uL4L._AC_SL1500_.jpg'
    ],
    description: 'Powerful tablet with A14 Bionic chip and vibrant Liquid Retina display.'
  },
  {
    title: 'GoPro HERO12',
    price: 399,
    category: 'Electronics',
    images: [
      'https://m.media-amazon.com/images/I/71Jz2dC4W+L._AC_SL1500_.jpg',
      'https://m.media-amazon.com/images/I/71KStGLI2kL._AC_SL1500_.jpg',
      'https://m.media-amazon.com/images/I/81ft+3LcnfL._AC_SL1500_.jpg'
    ],
    description: 'Rugged action camera with 5.3K video and HyperSmooth stabilization.'
  },
  {
    title: 'Fitbit Charge 6',
    price: 149,
    category: 'Electronics',
    images: [
      'https://m.media-amazon.com/images/I/61qZbCjEo0L._AC_SL1500_.jpg',
      'https://m.media-amazon.com/images/I/71mL0V5DJyL._AC_SL1500_.jpg',
      'https://m.media-amazon.com/images/I/71sPmU7bSBL._AC_SL1500_.jpg'
    ],
    description: 'Advanced fitness tracker with heart rate, sleep, and activity monitoring.'
  },
  {
    title: 'Bose SoundLink Mini',
    price: 199,
    category: 'Electronics',
    images: [
      'https://m.media-amazon.com/images/I/71P3aYxfRLL._AC_SL1500_.jpg',
      'https://m.media-amazon.com/images/I/71gZKn6A3zL._AC_SL1500_.jpg',
      'https://m.media-amazon.com/images/I/81J-+HjQ9JL._AC_SL1500_.jpg'
    ],
    description: 'Compact Bluetooth speaker delivering rich, powerful sound.'
  },
  {
    title: 'Adidas Running Shoes',
    price: 85,
    category: 'Fashion',
    images: [
      'https://m.media-amazon.com/images/I/71biNBVfG2L._AC_SL1500_.jpg',
      'https://m.media-amazon.com/images/I/71y8Ct3sbBL._AC_SL1500_.jpg',
      'https://m.media-amazon.com/images/I/71U4qkuAN2L._AC_SL1500_.jpg'
    ],
    description: 'Lightweight and comfortable running shoes for daily workouts.'
  },
  {
    title: 'Nike Air Max',
    price: 120,
    category: 'Fashion',
    images: [
      'https://m.media-amazon.com/images/I/71cs8RMa9UL._AC_SL1500_.jpg',
      'https://m.media-amazon.com/images/I/71QaRM0xUlL._AC_SL1500_.jpg',
      'https://m.media-amazon.com/images/I/71D0u0vZpzL._AC_SL1500_.jpg'
    ],
    description: 'Classic Nike sneakers with cushioned soles for maximum comfort.'
  },
  {
    title: "Men's Casual Shirt",
    price: 29,
    category: 'Fashion',
    images: [
      'https://m.media-amazon.com/images/I/61BzX-8TxPL._AC_UL1500_.jpg',
      'https://m.media-amazon.com/images/I/71awfGoeaxL._AC_UL1500_.jpg',
      'https://m.media-amazon.com/images/I/61KRIRXTXhL._AC_UL1500_.jpg'
    ],
    description: 'Comfortable casual shirt perfect for everyday wear.'
  },
  {
    title: "Women's Summer Dress",
    price: 49,
    category: 'Fashion',
    images: [
      'https://m.media-amazon.com/images/I/61KuG4SEK3L._AC_UL1500_.jpg',
      'https://m.media-amazon.com/images/I/71tAAqMLD1L._AC_UL1500_.jpg',
      'https://m.media-amazon.com/images/I/71W5uTXXdpL._AC_UL1500_.jpg'
    ],
    description: 'Elegant floral summer dress, light and breathable for warm days.'
  },
  {
    title: "Men's Leather Jacket",
    price: 199,
    category: 'Fashion',
    images: [
      'https://m.media-amazon.com/images/I/71X+uPJo1PL._AC_UL1500_.jpg',
      'https://m.media-amazon.com/images/I/71S1FOZnykL._AC_UL1500_.jpg',
      'https://m.media-amazon.com/images/I/71L9bG7F7QL._AC_UL1500_.jpg'
    ],
    description: 'Stylish leather jacket for a modern, rugged look.'
  },
  {
    title: "Women's Handbag",
    price: 75,
    category: 'Fashion',
    images: [
      'https://m.media-amazon.com/images/I/71D9ImsvEtL._AC_UL1500_.jpg',
      'https://m.media-amazon.com/images/I/71yec7d+QDL._AC_UL1500_.jpg',
      'https://m.media-amazon.com/images/I/71bJ+S4qgSL._AC_UL1500_.jpg'
    ],
    description: 'Elegant leather handbag with spacious compartments.'
  },
  {
    title: "Men's Slim Fit Jeans",
    price: 59,
    category: 'Fashion',
    images: [
      'https://m.media-amazon.com/images/I/71I6aZs-0eL._AC_UL1500_.jpg',
      'https://m.media-amazon.com/images/I/71SNeSXeTtL._AC_UL1500_.jpg',
      'https://m.media-amazon.com/images/I/61SVh1ilZPL._AC_UL1500_.jpg'
    ],
    description: 'Durable slim-fit jeans that match any casual outfit.'
  },
  {
    title: "Women's Running Tights",
    price: 39,
    category: 'Fashion',
    images: [
      'https://m.media-amazon.com/images/I/61GH6jFFUyL._AC_UL1500_.jpg',
      'https://m.media-amazon.com/images/I/71vToz6BMLL._AC_UL1500_.jpg',
      'https://m.media-amazon.com/images/I/71MvgxLwsgL._AC_UL1500_.jpg'
    ],
    description: 'High-stretch, breathable running tights designed for performance.'
  }
];

  const productGrid = document.getElementById('productGrid');
  const modal = document.getElementById('productModal');
  const modalImage = document.getElementById('modalImage');
  const modalTitle = document.getElementById('modalTitle');
  const modalCategory = document.getElementById('modalCategory');
  const modalPrice = document.getElementById('modalPrice');
  const modalDescription = document.getElementById('modalDescription');
  const thumbnailContainer = document.getElementById('thumbnailContainer');
  const quantityInput = document.getElementById('quantityInput');

  // Render products
  products.forEach((p, index) => {
    const card = document.createElement('div');
    card.className = 'bg-white rounded-lg p-3 shadow hover:shadow-md';
    card.innerHTML = `
      <img src="${p.images[0]}" alt="${p.title}" class="rounded w-full h-40 object-cover zoom mb-2">
      <h3 class="text-gray-800 font-semibold text-sm">${p.title}</h3>
      <p class="text-pink-600 font-bold">$${p.price}</p>
      <button class="mt-2 w-full bg-pink-600 text-white rounded py-1 hover:bg-pink-700" onclick="openModal(${index})">View</button>
    `;
    productGrid.appendChild(card);
  });

  // Modal functions
  function openModal(index){
    const p = products[index];
    modalImage.src = p.images[0];
    modalTitle.textContent = p.title;
    modalCategory.textContent = p.category;
    modalPrice.textContent = `$${p.price}`;
    modalDescription.textContent = p.description;
    quantityInput.value = 1;

    // Render thumbnails
    thumbnailContainer.innerHTML = '';
    p.images.forEach(img => {
      const thumb = document.createElement('img');
      thumb.src = img;
      thumb.className = 'w-16 h-16 object-cover rounded border cursor-pointer hover:border-pink-500';
      thumb.onclick = () => modalImage.src = img;
      thumbnailContainer.appendChild(thumb);
    });

    modal.classList.remove('hidden');
    document.body.style.overflow = 'hidden';
  }

  function closeModal(){
    modal.classList.add('hidden');
    document.body.style.overflow = 'auto';
  }

  function increaseQty() { quantityInput.value = parseInt(quantityInput.value) + 1; }
  function decreaseQty() { if(quantityInput.value > 1) quantityInput.value = parseInt(quantityInput.value) - 1; }

  // Search suggestions
  const searchInput = document.getElementById('searchInput');
  const searchSuggestions = document.getElementById('searchSuggestions');
  searchInput.addEventListener('focus', () => { searchSuggestions.style.display = 'block'; });
  document.addEventListener('click', (e) => {
    if(!searchInput.contains(e.target) && !searchSuggestions.contains(e.target)){
      searchSuggestions.style.display='none';
    }
  });
</script>

</body>
</html>
We will create two views:
resources/views/shop/index.blade.phpresources/views/shop/show.blade.php
These pages will use Bootstrap classes for fast styling.
🖼 index.blade.php — Product Grid
Important points:
- The
rowandcol-md-3classes create a 4-column responsive grid. - We use
object-fit: cover;to keep all product images uniform. $products->links()shows Laravel’s built-in pagination UI.- Using
shadow-smandcard h-100gives subtle visual polish.
📄 show.blade.php — Product Detail Page
@extends('layouts.app')

@section('content')
<div class="container">
  <div class="row">
    <div class="col-md-5">
      @if($product->image)
        <img src="{{ asset('storage/'.$product->image) }}"
             class="img-fluid rounded shadow"
             alt="{{ $product->name }}">
      @endif
    </div>
    <div class="col-md-7">
      <h2>{{ $product->name }}</h2>
      <h4 class="text-success">${{ $product->price }}</h4>
      <p class="mt-3">{{ $product->description }}</p>
      <p><strong>Stock:</strong> {{ $product->stock }}</p>
      <button class="btn btn-success btn-lg mt-3">Add to Cart</button>
    </div>
  </div>
</div>
@endsection
What makes this page good:
- Clear product name and price at the top.
- Big image with
img-fluidfor responsiveness. - A dedicated “Add to Cart” button we’ll wire up in the next step.
- Shows stock quantity to build urgency and trust.
⚙️ Step 4 — Using a Layout Template
To avoid repeating HTML (like <head> and navbars), place both shop views inside your existing layouts.app layout.
If you don’t have it yet, create resources/views/layouts/app.blade.php:
<!DOCTYPE html>
<html>
<head>
<meta charset="UTF-8">
<meta name="viewport" content="width=device-width, initial-scale=1">
<title>{{ config('app.name','MyShop') }}</title>
<link href="https://cdn.jsdelivr.net/npm/bootstrap@5.3.3/dist/css/bootstrap.min.css" rel="stylesheet">
</head>
<body>
<nav class="navbar navbar-expand-lg navbar-dark bg-dark">
<div class="container">
<a class="navbar-brand" href="{{ route('shop.index') }}">MyShop</a>
</div>
</nav>
<main class="py-4">
@yield('content')
</main>
<footer class="text-center py-4 text-muted">
© {{ date('Y') }} MyShop. All rights reserved.
</footer>
</body>
</html>
This gives your shop a consistent look.
⚙️ Step 5 — Adding Some Demo Products (Optional)
If your database is still empty, create a few demo products so you can see the frontend working.
Use tinker:
php artisan tinker
Then:
Product::create([
  'name'=>'Coffee Mug',
  'description'=>'A stylish ceramic mug for coffee lovers.',
  'price'=>9.99,
  'stock'=>20,
  'category_id'=>1
]);
Repeat this for 3–4 products, or seed them using Laravel factories later.
🧩 UX and Design Tips
Building the frontend isn’t just about code — it’s about creating a smooth experience. Here are battle-tested tips:
- Keep product cards consistent — same image height, same text alignment.
- Show price clearly and use a distinct color like green.
- Add hover effects on cards using CSS (
.card:hover { transform: scale(1.02); }) to make it interactive. - Use categories as filters — in the future, add a sidebar to filter by category.
- Make it mobile-friendly — test on your phone often.
These touches can make your site feel professional even at an early stage.
✅ Summary
At this stage of your Laravel e-commerce journey, you now have:
- A public-facing shop homepage that shows your products
- Clean, responsive product cards
- A product detail page with description, price, and stock
- A strong foundation for the upcoming cart and checkout features
This is a major milestone — you’ve turned your backend data into something customers can actually see.
🚀 What’s Next
In Step 6, we will build a shopping cart system that allows users to:
- Add products to their cart
- View their cart contents
- Update quantities and remove items
That’s where your store starts feeling real to customers.